Tuesday, May 31, 2011

As far as I am aware, everyone is still here.

     Most people I know are aware that two Saturday's ago, the 21st of May was supposedly the Rapture when god's loyal followers would be brought up to heaven and the rest of us left here to wait for the world to go to seed.  Everyone is still here, so Mr. Crazy Pants was apparently wrong.  I won't go into the 17 reasons how he got his prediction wrong because this blog is about Cooking,  not my strange hobby of watching every documentary the history channel plays.  (by the way History International is where its at for any one who cares)  Back to the cooking.  So, the world is going to end what do I do?   I make cookies!  That same Saturday the 21st was also my dear Friend David's Birthday.  He requested me to surprise him with some delicious baked good.  So staying in theme, Rapture cookies it was!


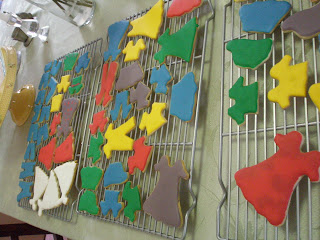
     So i started with a simple Pate Surcee dough, which is a basic sweet tart dough which can be used similarly to sugar cookie dough.  I had it in the freezer left over from Easter.  Rolled them out as you would any cookie dough and then started cutting out shapes.  I had a few cutters: a dress, a wedding dress, a gingerbread man, and a baseball cap. I mostly ended up using the Regular dress and altering it with a knife to make different dresses, blouses, skirts, shirts and pants, hazmat suits and a few overalls.  It was pretty simple. 
  
     If you are wondering at this point what this has to do with the rapture that was supposed to happen on the 21st, here is a brief explanation.  The rapture is a highly debated theological topic, but a common thought on what would happen is that those being raptured would blink out of earthly existence and be brought to heaven.  This would of course leave behind the clothing of these people.  Thus, empty clothing rapture cookies.  If your still not getting it, my friends got it, which was the point.  

     I baked off the cookies until just baked with a smidgen of browning on the bottom, and then cooled on a rack and moved on to frosting the cookies.   I made a basic royal icing:  egg whites and confectioners sugar.  When making royal icing I almost always use pasteurized egg whites in a carton.  This stuff is awesome for a 2 reasons. Its pasteurized, so its safe for children, the elderly, pregnant women and pretty much anyone who would worry about immune deficiency's.  Also you can use as much or little as you want with out wasting egg yolks. (i hate to waste things)  When your finished using it you can freeze the remainder of the carton until next time.   You can't however use pasteurized egg whites in a carton for making meringues, angle food cake and anything that involves whipping egg whites to a foam.  They simply do not whip.  To make the royal icing for these cookies you whip confectioners sugar into the egg whites until smooth and well combined and at your preferred consistency.  For these style of cookies I like the icing a bit runny.  I generally use paste food coloring for icing, but it was late and I was tired and wanted to go to bed so i used liquid.  Liquid can thin out icing, which i put into consideration when
I was making the icing. I then simply spread the icing on the cookies with a butter knife.  Very unlike me to not get out my fancy tiny off set spatulas.  Again, I was tired.  With a slightly runny icing its best to sort of go around the outline of the cookie and then fill in the center.  Another option is piping into the runny icing or just use a stiffer icing to begin with and only pipe it.  When it comes to decorating cookies, there are no hard set rules.  Just have fun!


     This is a small sampling of the cookies.  I kept them one color because I didn't want to break out the piping bags and the multi colored designs I attempted with my butter knife and index finger left a lot to be desired.  My friends enjoyed them at David's birthday party and we all had one when we counted down the last 10 seconds to 6:00pm which was apparently when the rapture was scheduled to happen.  everyone was still there at 6:01pm and they all enjoyed their respective cookies.  

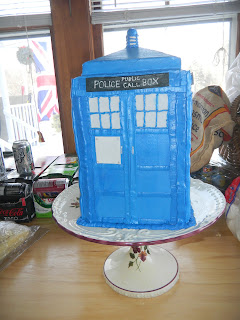
     I recently posted about my recent entry in a contest on BBC America in the "Where's the TARDIS?" contest.  I would appreciate if you take a moment to click on the link below the picture of my entry and if you like what you see please "like" it.  That is how the voting works.  Thanks in advance to anyone who wishes to consider my entry!


Happy Cooking!

Monday, May 23, 2011

Wicked Sweet TARDIS! I need your votes!

Well readers (if anyone is still out there) Its been quite a while.  I have been away from posting for far too long, and that needs to change.  I have a few Culinary Adventures from my long long time away but those will have to come later.  Tonight's update is entirely about me getting votes on a cake i entered into a contest.  It has never come up, but I am a huge Doctor Who fan.  For my recent birthday I made a TARDIS cake.  The TARDIS, for those of you who do not know is the time and space machine of the Doctor from the British Science Fiction television show.  The BBC America is holding a "where's the TARDIS?" contest and i have entered my cake.  Cakes are kind of my thing.  I haven't had the chance to show that on the blog yet, but I love making them.


I ask that you take a moment and click the link, If you like what you see, i ask that you "like" it.

Thank you for your time,
                Happy Cooking!

Thursday, April 28, 2011

Really? today?

   I recently discovered through a Facebook update that today is apparently National blueberry pie day.  I am a very large fan of blueberry pie, none better than my cousin Joyce's blueberry pie that she makes with hand picked wild blueberries.   You, like I may have noticed that today is in fact April 28th, which is not a day in late July or early August when blueberries are actually in season.  While it is entirely possible that other areas of the country have a blueberry season earlier than this, i am fairly certain that time is not late April.  The Blueberry growers of the United States should really band together to change national blueberry pie day to a day that could actually help sales of American grown blueberries.

Just a thought!

Sunday, February 13, 2011

Give Peas a chance!

   I love split pea soup.  Real homemade split pea soup. I rarely order it in a restaurant, or get it anywhere other than my own kitchen, because its never remotely as good as home made.  The best part is that it is ridiculously easy.  When I was younger I would ask my mother to buy a ham for dinner because I knew that meant that later that week my grandmother would take the ham bone and use it to make pea soup.  The soup can easily be made without a ham bone, but you get a little better flavor from using the bone.

My Grandmere's Split Pea soup
serves ? I eat more than my fair share, but id guess about 6

Recipe
1 ham bone (optional but awesome)*
about a cup or so of ham cut into small chunks
1 small-medium onion
1 medium carrot
2 cups dried green split peas
6 cups water

   Start off by cutting and off most of the meat off the ham bone.  Just whatever you can cut off with a knife, there should be a little meat left on the bone.


 Cube or cut into small chunks a little over a cup of the ham, more or less depending on how much meat you want in your soup.  Set the ham aside.  *If your not using a ham bone, you going to use a ham steak.  Deli ham is not okay.  Your going to want to look for a ham steak with a bone in it, but if you cant find one just try to find a ham steak that looks as un-messed with as possible.  The less messed with the ham is, the better the texture will be. I'll say it again, Deli ham is not okay.  Next up you want to dice your onion and carrot.  This is a good time to work on your knife skills.  Take your time and dice them into little cubes.  They don't have to be perfect, and you could even just get them to a small rough chop, but its always good to work on your knife skills.  Sort through your dried peas, making sure that everything in there is a pea and not a rock or other debris.  Give them a nice rinse and drain.


  Put your ham bone (*or 1/4 of your ham steak) in a large stock pot or your largest pan.  Add your onion, carrots and peas to the pot and then about 6 cups of water.  Bring to a boil and then simmer until the peas and carrots are mushy.  At this point, turn off the heat and remove the ham bone to a cutting board.  Allow the bone to cool down for a bit and then pick any meat remaining off of the bone and set aside with the ham.  *If not using a ham bone, turn off heat and attempt to fish out as much of the ham as you can using a slotted spoon.  Its not the end of the world if you cant get all of it or any of it, but we are going to process the soup next so whatever ham remains in the soup will be processed too.  There are a few options for processing the soup at this point.  My grandmother used a standard bar blender and that worked pretty well for her.  I personally opt for my stick blender.  Stick blenders are awesome, and I recommend them to every one, you just have to be careful when using it or you might accidentally splatter soup everywhere.  If looking for a stick blender avoid the very inexpensive off-brand kind you will find at the drug store.  They have no power and simply are a waste of money.  Another option is to use a food processor for your soup, however one of those tiny food processors you use to make salsa and pesto probably isn't your best option.  The tiny 1-2 cup capacity will take forever and probably make a mess.  The 4th option is to use a food mill if you have one or push through a fine mesh strainer.  After processing return the soup to the stove and add your ham.  Adjust the consistency at this point.  If it seems too thick, add some water and bring to a serving temperature.  If its too thin than bring your soup to a boil and simmer down the soup until it is thicker.  Be sure to scrape the sides of the pot and stir often.  At this point you want to find the nearest bowl and spoon and dive in.  You will probably not wish to be disturbed for this first bowl, I know i never do.  It may not look like much, but it is delicious.


   As it cools down it tends to get a bit solid, just heat it back up, remembering to stir often, and it will be smooth and wonderful again.  I think the soup would also be good done vegetarian with no meat or bone interaction at all, but I've never tried it, so I will have to get back to you on that.

Wine day 10:  The wine has moved from the Primary fermentation carboy to the secondary fermentation carboy which is a large 6 gallon glass bottle with a narrow neck that looks very much like the bottle from a water cooler.  The wine will stay in there for at least another 24 days.  In 10 days we will "whip" the wine, which I will explain more about when we get to that point.  For now it just gets to hang out in my spare bedroom.

Until next time!

Wednesday, February 9, 2011

There are leeks in my cellar floor!

   Well not any more!  Until just recently, there were leeks in my cellar floor, there are still plenty of leaks in my cellar floor, but no leeks.  A little confusing I know.  We have quite a large vegetable garden in my back yard, and every summer we grow large quantities of various vegetables.  We do the standard tomatoes, peppers, cucumbers and of course zucchini.  So much zucchini!  But we also grow beets, rhubarb, Swiss chard, string beans, various winter squashes and for the past two years, my beloved leeks.  I fell in love with leeks about 2 years ago.   I made Julia Child's Potage Parmentier or potato and leek soup and I was changed.  This soup is just so very tasty, wicked delicious!  I soon found that the leeks I was finding at the supermarket were more often sub-par than not.  Quite frustrated with the lack of quality leeks I decided that they should make an appearance in the garden.  The leeks came up quite well even though we had a very wet and cold summer.  They again were featured this past summer, this year getting 2 large rows.  Leeks however take a while.  They are a fall vegetable.  Fall brings the frost in New England so I had quite a few more leeks than I was going to be able to eat in the time allotted by the weather in my climate region.  So a plan I did hatch.  I would take these leeks, box them up, and that box would go live in a cold section of my cellar and would be there when I wanted to use them at a later date.  

   
The box came to live in a hole in my cellar floor, left over from the time my father tried to dig a well there.  The well never came to be, and the hole was mostly filled in, save for a large dip where a chunk of concrete floor no longer lives.   I will admit, i kinda forgot about my leeks for a while.  Two days after pulling them out of the ground (in the rain mind you) I left for a 15 day vacation, and leeks weren't really on my mind.  (oysters however were, but that's a story for another time)  The the other evening I was reminded of my waiting leeks and decided that I would put them to use if they hadn't gone bad.  This is what I pulled out of the hole in my cellar floor.


   Now this leek definitely looks well past its prime and not particularly appetizing, but what lies within is a great surprise!


   Looking pretty good for leeks that have been sitting in my cellar for 4 months.  I wanted to do something with these leeks that I had never done before, i decided on braising.  I more or less used Julia's recipe for braised leeks.  

Julia Child's braised Leeks
easily serves 4 

Recipe
12 leeks (more or less)
water
6 Tbsp butter cut into pieces
QS salt
Fresh thyme or parsley

   Start with removing the tough leaves and roots from the leek.  If the outer layer of skin is dry remove it.  You are looking to only use the white and light green portion of the leek.  The length you are aiming for is about 6-7 inches long, but your leeks may vary.  Split the leeks down the center and then holding the leek at the root end swish around in some water in an attempt to dislodge any dirt particles.  Be sure to hold the ends of the leek halves so they do not fall apart.  


  After you have rinsed the leeks you are going to layer them cut side down in a fairly deep flameproof casserole dish with a lid.  You don't have to specifically use a casserole dish, just a flameproof cooking vessel with a lid that can be used on the stove top.  The lid does not need to be a tight seal, as it is suppose to be ajar anyway.  You will end up layering the leeks in 2-3 layers depending on the size of your cooking vessel and how many leeks you are using.   Pour enough water into the dish to bring the water level 2/3 the way up the leeks.  Sprinkle your butter and salt over the top of the leeks and cover your vessel with the lid slightly ajar. 


 Bring your leeks to a simmer on the stove top and continue to cook until the white ends are tender and you can easily pierce them with a paring knife.  Now Julia claims this should take 20-30 min, and that most of your cooking liquid will have boiled away.  I always believe Julia, but my leeks took much less time and there was more than 1/2 the liquid left.  When your leeks have become tender move the leeks to a large shallow baking dish in one layer.  And pour the remaining cooking liquid over the leeks.  As I mentioned, I had a excess of cooking liquid.  If this happens to you, you have a few options.  The butter would not have boiled off during the stove top simmer so you can simply add 2 tablespoon of butter to your dish, which is what I did.  If you are not under a time crunch you can boil down the cooking liquid until there is only a little water left in the liquid, and then pour this on your leeks.  The Leeks now go into a 325F oven for 20 min or until they have browned slightly.  My leeks were very Tender already so I choose to stick them under the broiler for a short time until browned.  If you use this method, be sure to keep an eye on your leeks.  I am seriously addicted to my broiler, so I have a pretty good mental timer for using it with various foods, but generally you want to keep an eye on anything you put under a broiler.  After browning, remove the dish from the oven and sprinkle thyme or chopped parsley over the leeks. 


   You can serve them immediately or Julia tells us they can be re-heated later.  I don't think the dish would suffer any from re-heating so it seems like sound advice.  

   The Leeks were delicious.  They have a nice smooth texture and subtle flavors.  I will certainly make this dish again.  The recipe gives variations involving adding cheese or cheese sauce at the point you put the leeks in the oven.  I plan on trying those variations, but I think I prefer the braised leeks as is.  It is difficult to imagine that this dish could be improved.  I used my left over cooking liquid on some buttery potatoes.  I simply boiled some small Yukon gold potatoes skin on and boiled down my cooking liquid until there was very little water left.  When the potatoes were done but not mushy, I drained and quartered them.  I then simply sauteed the potatoes in the cooking liquid with some salt, pepper and thyme. 


    The leek flavor in the cooking liquid adds an interesting flavor to the potatoes without causing the potatoes and leeks to taste the same.  The leeks and potatoes were served with spiral cut ham and fresh popovers.  The ham wasn't anything special, just a supermarket ham with a jazzed up packet of glaze.  The popovers were Alton Brown's recipe and came out pretty tasty.  


   Looking at this evening's plate picture I've realized that perhaps i should invest in a few new dishes that are free of my mothers pink tulip pattern.  That's going onto the to-do list.

   Wine update Day 5:  The wine has gone from pretty clear to opaque and smells of alcohol.  It seems well in its way to becoming wine.  
       
Happy cooking!


Sunday, February 6, 2011

White wine day 3: the day of Yeast!

  As promised,  here is a photo of our lovely little yeast colony in our white wine.  It is not particularly pretty, but it actually smells great.  Just like bread dough.


  The same yeast used in making wine and brewing beer is used in baking and has been since our culinary ancestors started baking leavened breads and making wine and beer.  Interestingly the yeast took quite the left turn overnight.  Saturday night when i checked on the carboy, the yeast was all floating at the top like a disk of foam.  I looked at it Sunday morning and most of it had dropped down in to the juice leaving islands of yeast floating on top.  This is suppose to happen, but i just don't remember it happening this quickly.  The floating islands of yeast are visually bubbly, due to the CO2 the yeast is producing. The juice sounds carbonated, which is also suppose to happen.  It sounds just like when your making that ginger ale, cranberry juice and rainbow sherbet punch for the refreshment table at a high school function where there will be parents involved.  That sound after you have poured the ginger ale into the punch bowl, and added the sherbet  but before you've added the cranberry juice.  The sound of the carbonation forming on the sherbet,  its quite noticeable.  By the way I do not recommend that punch to exist anywhere outside of high school, its not really as good as the mom's setting up the refreshment tables lead us to believe back then.

    I made it a point to check on the yeast situation later Sunday evening before posting, and the yeast has virtually fallen completely from the surface.  The carbonation aspect of the juice appears to have increased.  If you look at the juice it is actually bubbling like a glass of ginger ale.   It still has the strong yeast smell and appears to be coming along nicely.  By Thursday it should be about ready for the next step in the wine making process.  
   
   I have some fun non-wine posts planned for this week.  So until then, 
Happy Cooking!


Saturday, February 5, 2011

Turning Water into Wine!

   No, I'm not entertaining Jesus, but I will in fact be turning water into wine...technically.  I mentioned in my last post that I had made my own wine last year.  It was a red, Pinot Noir.  This time I am making a white wine. I chose a blended kit. It is suppose to produce a wine with a medium body, which should pair well with a variety of foods without being over or underwhelming.  I use the Pinot Noir more for cooking than drinking, but it is very "drinkable."  The reason behind this is that I tend to drink wine with food rather than just have a glass, and I generally only drink wine with a special meal that I have put a lot of effort into.  Shake and bake chicken does not warrant a bottle of wine in my household. 


     The process of making wine is fairly simple.  You start off by sanitizing your equipment with a solution of metabisulphite.  This is in fact a very important step, it kills all the nasties, and trust me, you want them nowhere near this process.  Google food borne illness and you will understand why.  On second thought, Don't Google food borne illness.  Trust me on this; i didn't want to eat for a week after taking that particular class in my safeserv course.  I've gotten off topic here, let us return to the wine.  After sanitizing your equipment, you then dissolve a packet of bentonite in 1/2 a gallon of warm/hot water in your 8-gallon capacity carboy  (giant bucket with pierced lid).  Bentonite I've discovered can serve 2 purposes in wine making. If a small amount is added to the wine at the beginning, which is the case here, it acts as a yeast energizer which gives the yeast a kick in the pants to start fermenting the juice sooner and faster.  The second use for it is after the fermentation has finished.  A larger quantity of the clay like bentonite is added at the end of the fermentation process a few days before bottling.  It helps to clear the wine and pull any remaining yeast out of the wine.  My particular kit uses a different clearing agent, but we will cover that topic at a later date. 


    I choose to use spring water for making wine, as my town's water has a few issues with total dissolved solids and the next town over is the town that the movie "A civil action" was based on.  The next step is to add the concentrated grape juice to the carboy, after which you add enough water to bring the liquid level to 6 gallons (water into wine!) and then check the specific gravity using a hydrometer/saccharometer.  The specific gravity (or Brix if you went to culinary school like I did) measures the density of the juice/wine in regards to the amount of sugar in the liquid.  The same thing is done when making a sugar syrup, but the sugar syrup is much more dense than the juice and later wine is.  The one used for wine is generally called a hydrometer while the one for syrups is a saccharometer.  To me they are both the same tool, but made to test at different levels.  The sugar in the juice needs to be at a certain level for the fermentation to go properly.   The sugar acts as food for the yeast, if it does not have enough it will die at worst, or just not ferment very well or long enough at best. In order to get longer stronger fermentation and as a result more alcohol into a wine, some producers will add additional sugar to the wine. (*Yeast Fun Fact: the more sugar the yeast gets to consume, the more alcohol it creates)

   The final step of day 1 is to add the yeast and then cover the carboy.  The yeast is what makes wine possible.  Without the yeast the wine does not ferment.  It’s possible that the juice can ferment with out the addition of yeast, but that is generally only when you start with whole grapes.  Whole grapes tend to have yeast on the skins and the skins are present in the juice long enough after crushing to get into the juice and start fermentation.  I'm going to put off explaining the wonders of Saccharomyces cerevisiae, more commonly known as yeast, until we cover bread.  And if anybody is wondering, yes I had to know the proper name of yeast for my culinary school final, but conveniently I didn't have to spell it. 

     Now we can have laugh at Amy time.  I actually started the wine on Thursday evening 2/3/11, however I forgot a step because it has been quite a long time since I have actually made wine, and I got distracted from the task at hand.  I realized Friday evening, when I went to take a picture of the yeast doing its happy fermentation, that I had forgotten to add the yeast.  I thought I had added it, but there the yeast packet was sitting, unopened and certainly not in the carboy with the juice.   I decided not to worry too much about it, so I gave the contents of the carboy a vigorous stir, tested the temperature to be sure it was not to cold, and added the yeast. So by Sunday evening it should be a happy fermenting colony of yeast. I'll post a nice photo of the  yeast colony on Sunday evening. 

     Making this white wine has got me thinking about what kind of wine I want to make next.  I have 3 specific wines on my to-do list.  They are as follows in no particular order:
       1. A rose or blush wine.  
       2. A mead, ether plain or with berries.  
       3. This one your going to laugh at, but a "mist" wine in form of a berry Merlot. 

   The first item on the list requires very little explanation.  Blush or rose wine is simply a third, often overlooked style of wine that I happen to enjoy.

    Number two on the list would be Mead.  Mead is wine made from honey instead of grapes.  Some times it is made plain, and sometimes it is made with fruit to add extra flavors.  They don't generally sell kits for this, so i would have to source all the ingredients separately as well as work out the recipe and wine making process.  I have plans for some of this mead, the rest would just be for general drinking.  (*History Fun Fact about mead: The word honeymoon comes from the old English custom of a newly married couple drinking mead, a honey wine, for the first month or moon of their marriage.)

    The third item on this list requires an explanation.  The wine supply store sells "mist" wine kits that to my understanding, creates a beverage very similar to the barely alcoholic beverage known as Arbor Mist.  My friends and I refer to Arbor Mist as 'faux wine' because it is just not wine, and it has the alcohol content of a slightly over ripe cherry.  It is basically a wine cooler sold in a multi serving bottle, and its super tasty.  It is also super embarrassing to buy it at the liquor store, and they rarely have the only good flavor: Blackberry Merlot.  So My Friend and i who enjoy it, thought it might be a good idea to make some.  It would be cheaper, likely tastier and less embarrassing.

      I'm still very unsure which wine will come next.  It won't happen for a while, but maybe I'll put up a poll as to which style to do next when the time comes.  It's just a thought.
    
      I'll be back tomorrow with a brief post about our lovely yeast colony.
Happy Cooking!